Showing posts with label 1790's. Show all posts

Saturday, 15 June 2013

1790's gown wants

Or; I need a new project like, well, like not at all. But...

But I recently found this wonderful striped linen. It is a lovely quality and drape and would make for a wonderful summer's gown.


And then I found this picture.

Source

And I already made this kind of dress twice, so the patterns is true and tried.


And my 17th century shirt project is going so well that I will probably finish it within a few days and then I will need a new hand-sewing project. And, correct me if I'm wrong, but wouldn't a striped, 1790's gown make for a wonderful hand-sewing project? It is almost like I has no choice. Right?

Tuesday, 7 June 2011

Blue 1790's outfit


This was a totally un-planned outfit. In December 2009 I stumbled over this painting and fell in love with the blue and rose outfit. Love at first sight and I just knew I wanted it for the 12th Nigh Ball that was (then) a month away...

Thursday, 2 June 2011

White gown of 1797


I fell in love with the beautiful gown from Tidens Toj years ago and set out to make it in embroidered white linen. Only I found that I didn’t have enough for fabric for the lovely drape in the front. As the fabric had been resident in my stash for years there was no chance to get some more. It still turned out to be a lovely gown and I’m very pleased with it. I adapted the pattern for my roundgown for it, making the front a bit less gathered, for example.

Sunday, 13 February 2011

Almost finished 1790's stays

All my plans of finishing the stays soon after my last post about them got a bit delayed due to a nasty cold, but here are some progress.

After attaching the shoulder straps I needed to try them on to be able to determine how longs straps I needed. I used some old boning left over from an old pair of stays, which is why it sticks out so. Trying them on made me realise two things. First; they were actually not too small, which I had feared, but too large! So if I don’t grow larger I won’t be needing that stomacher I made. The second thing, which I already suspected, was that I needed more boning in the front, as you can see here:

Saturday, 22 January 2011

More 1790's stays

The stays are coming along very nicely and I think they will be finished pretty soon.

Most extant stays I have read about are finished pattern piece by pattern piece and then whipstitched together. However, there is an Swedish example in Brita Hammar and Pernilla Rasmussen's Underkläder that have been put togther with the right sides of the pattern pieces put together and then stitched like that. It is noted that these stays probably wasn't made by a staymaker, but as I'm not a staymaker, I don't feel bad that I make them like that. I started with sewing the front and back together, putting the right side of the bottom layer of linen to the right side of the silk (which has been basted together with the second layer of linen previously).
Photobucket

I then pressed the seams, folded so the right sides are, well, right, pressed again and then basted the three layers together.
Photobucket

Then I sew all the pieces togther, pressed the seams and stitched them down. It should be noted though that I have never seen stays being made that way so I don't claim any historical acuracy here, but it works for me.
Photobucket

The boning channels were next. My original plan was to make the stays fully boned, but after looking through Underwear: Fashion in Detail I fell for the green stays on page 122, which has pretty cross-stitched decorations. I'm not copying the boning pattern, or the decorations slavishly, but I'm using that for inspiration. The boning channels are sewn with white linen thread that I inherited from my grandmother- she used it in lace-making. I like it, because the stitches shows up better than with ordinary thread. The boning channels are 1 centimetre wide and the channels for the decorations either 5 or 8 milimetres wide.

The lacing holes are sewn with the same linen thread, vaxed. One of these day I'm going to becoming great at sewing them, but that day isn't here yet...
Photobucket

Another alteration to my original plan was the decision of binding the stays with chamois leather. A little digging brought me a supplier in Sweden and it took me two days to get it. It's very soft and supple and has a pale yellow colour. To rest my hands a little a took a pause in making the lacing holes and cut out strips of the leather and bound the stomacher. I can tell you that with a sturdy needle it was no problem at all to sew on a machine. The leather is quite stretchy and it was very easy to sew the point of the stomacher. I wouldn't sew the binding of a pair of tabbed stays a machine, but I will on this pair.
Photobucket

Folded over and stitched to the backside. The binding is 5 milimetres wide and much more padded than a fabric binding. Not a bad thing when it comes to stays.
Photobucket

My next step will be to cut out the shoulder straps and attach them. Then decorate the stays, my plan is to use white and pale yellow silk for the cross-stitch. Boning, binding and then put in the lining. It's a fun project and I look forward to try them on.

Friday, 14 January 2011

1790's stays in progress

The fashion of the 1790’s is reeling between the earlier 18th century and the upcoming Regency fashion, and stays seem to reel too. My love for the 1790’s is quite new, but in the last year I have made three gowns from that period, so I felt that it was about time to make a pair of stays that were more correct for the period. Then I got really inspired when Katherine Hay posted about an extant pair in Corsetmakers in December. I want stays like that, the kind that are more like earlier 18th century stays in shape, but shorter and tables. For a pattern I once again turned to Norah Waugh and based my pattern on the front and back-laced pair that have the four stuffed balls attached to the back. I used the pattern I drafted for my un-finished stays as a template and came up with this. Picture of those can be found this old post on my stay-making history.

Photobucket

Mats made sure I did it correctly.
Photobucket

I’m making it out of two layers of white linen and one of light blue silk taffeta. I also added a small stomacher. I have never seen that on stays from that period, but my weight fluctuate a bit and I want stays that I can use even if my weight differs. There will be shoulder straps too, but they aren’t cut yet. Here they are with the silk basted to the linen.
Photobucket

You may wonder why the silk doesn’t completely cover the linen. Well, that has to do with the fabric. Last summer I planned to make a striped robe battante. I wanted it in light blue and white and found the perfect fabric. I ordered and the colours were exactly what I wanted! However, the stripes were not 8 centimeters wide as I thought, but 8 inches… Totally my own fault as the website clearly states the width. So, no robe battante. I do have some plans for the fabric, but there’s a lot of it and I liked the idea of pale blue stays. However, 8 inches are wide, but not as wide as my pattern pieces, so some piercing was necessary.
Photobucket

I know that it would have been easier to choose another fabric, but I got set on having them in this colour, so piercing it is.

I am now in the process of assembling the stays and I hope to show more of them next week. Though I’m full of admiration for those who hand sew their stays completely, my hands can’t handle sewing through all those layers. So I use my machine for assembling and boning channels and then hand stitch the lacing holes and the binding. My plan is to make them fully boned with stitching and other details in white.

Tuesday, 14 December 2010

Short stays

I have just drooled over a post in corsetmakers on short stays.

Don’t you think that I need one? Considering that I have three outfits from the 1790’s alone. This is more than for any other decade of the 18th century. I’m still in a total funk when it comes to 18th century sewing, but stays are always fun. And as I still can’t finish my 1780’s stays due to the missing should piece… Imagine, a pair of stays without tabs!

I am sewing anyway. I’m almost done with a fifties pencil skirt in grey wool. I just need to hem it.

I need hair advice! I have cut my hair into a forties middy-cut, so now it just tough my shoulders instead of halfway down my back. I'm having a wig made for a 1780's hair, but what to do for the 1790's. Curl it madle and wear it- how? I have never researched shorter 1790's hair. Anyone with a good picture?

And just because a post if more fun when there are pictures in it.
Photobucket

Doesn’t she have a most gorgeous red hair? She must have been quite brave not to powder such unfashionable haircolour away. And isn’t the collar on the dress ugly?

Friday, 8 October 2010

Feel the hat love

Hats are great and 18th century hats the greatest. I have way too few of the, only three, but I plan to do something about it. How can you not want to, after looking at this:
1780’s
Photobucket
Photobucket
Photobucket

Those ribbons are just crazy.
1790’s
Photobucket
Photobucket
Photobucket

I Want This One So Much!

Friday, 22 January 2010

lamodeillustree does it again

You know, I kind of need some 1790's outerwear, don't I? Especially after this post:

http://community.livejournal.com/lamodeillustree/269259.html?view=994251#t994251

I'm not quite sure about the giant muff, but I do love the coat. What do you think about the collar? My interpretation is that it's sewn to the coat down to the waist and then it's hanging free.

Wednesday, 13 January 2010

The makings of a 1790's outfit

Photobucket

Most in this entry have been posted before, I just wanted an entry with the project from start to finish. What inspired me and how I went through it. I attended an 18th century 12th Night ball last week and hadn't really planned to make new clothes. I don't like working against a deadline and I had something to wear anyway. Then I saw a painting from 1796 posted atlamodeillustree and I fell hard and completely.

Photobucket

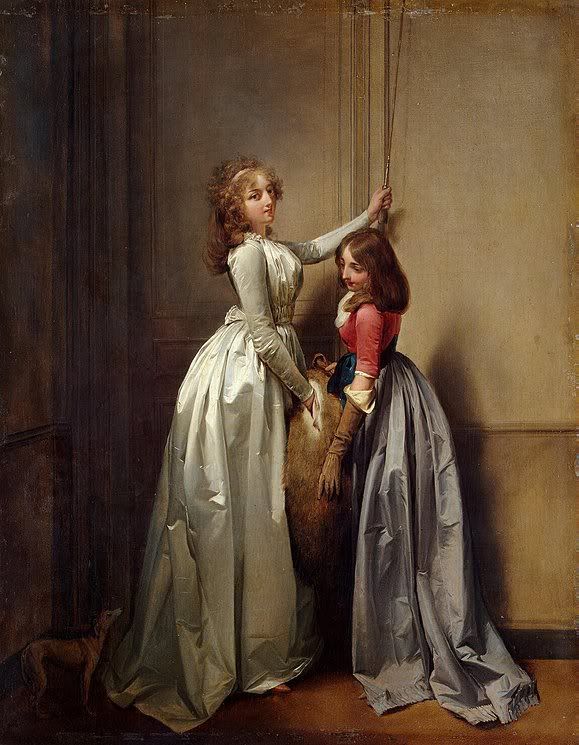
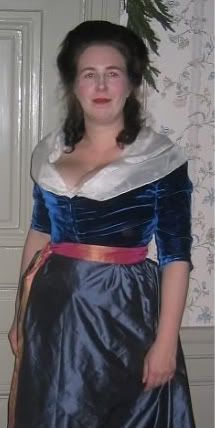
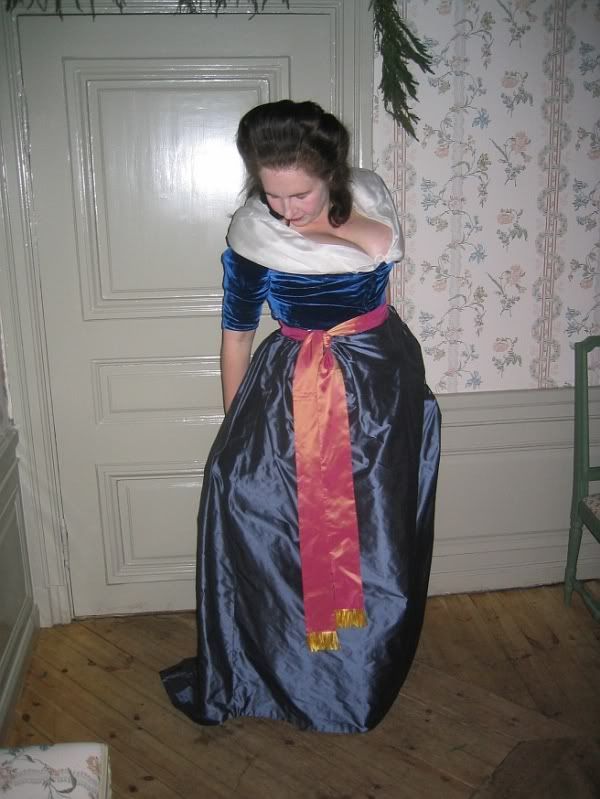
I actually liked both outfits, but it was the one in pink and blue that caught my eye. I don't know why, really, because it's a fairly simple outfit. And not that easy to make out either. Is it a small jacket she's wearing and how is it closed?Of course, it also gave me freedom to make an interpretation. After looking at jackets and pierrots from the 1790's, they all seemed to have a short peplum in the back, even if they stopped at the waist, or just above. I decided to make my jacket like that, even if no peplum shows and she's wearing a sash on the painting. It will make the jacket more versatile for me, tucking it inside (were it helps to give the skirt oomph) and with the sash, or with the peplum showing.

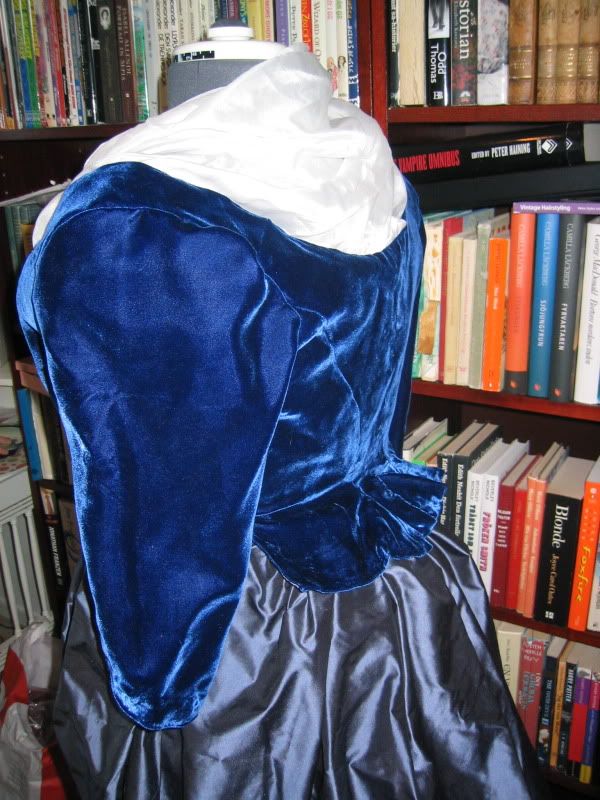
I also needed to think about fabric choice. The petticoat was easy, I had plenty of silk taffeta in my stash in a colour very close to the painting. However, this being in the months before Christmas and with all other purchases I didn't want to buy more material than I had to. So I dug around in my stash a little more and found a nice blue velvet that had been lying around for 20 years. Definitely time to put it to a good use. All in all I only did very few purchases for the whole thing and the biggest of those was half a metre of silk taffeta for the sash.

The petticoat was very easy. About 50 centimetres of the back was cartridgepleated down to 5 centimetres. The front was left unpleased and the remaining fabric just pleated into one centimetre wide pleats. It also has a short train. I didn't really used a pattern, but looked at other patterns for 1790's petticoats and used them as guidelines for the pleats the the length of the train. What I didn't do was the pleated trim, due to time constraint, but I have plenty of fabric left, so I'll trim it later.

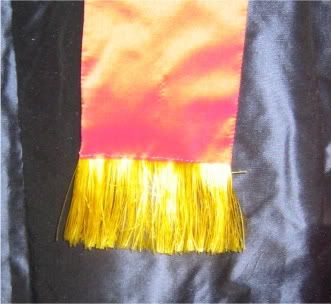
The sash was very easy as well. I wanted it pink and found a very nice two-toned taffeta I liked. It photographs a bit more yellow that it appears for the eye. On the portrait the sash seem to have a little peak in the back, which worried me a little, as I felt that the peak would easily fold down. So I decided to put a bone to support it and that seem to work very well. I also wanted the sash to end with a fringe. I just made a row of backstitches at the point were I wanted the fringe to start and then simply removed the bright pink threads in the silk, leaving only the yellow ones.
Photobucket

The biggest challenge was the jacket. What pattern to use? I draft my patterns myself rather than enlarging, but I use existing patterns as guide for proportions and seam placements. I have an 1780's pierrot and first I thought I could use that pattern.
Photobucket

But I'm not altogether pleased with the fit, the neckline is too wide in the front and I felt that the peplum was too wide and too long. However, the bodice on the 1797's gown I made earlier in the Autumn, fits perfectly.
Photobucket

The back, of course, has no peplum, so back to the books I went and I found what I wanted in Janet Arnold, in the riding habit dated 1795-1805. I also felt a bit unsure on how to do the front of the jacket. After having done two bodices with drawstring front, I didn't want to do that again. Besides, I don't think velvet lends itself to that type anyway. While I was thinking on front closure I made up the lining. Following through with finds in my stash, the lining is made by very un-18th century printed cotton, interlined with a heavier cotton and with two plastic whalebones in the front. I decided to lace the lining shut, and for the time being pin the front closed.
Photobucket
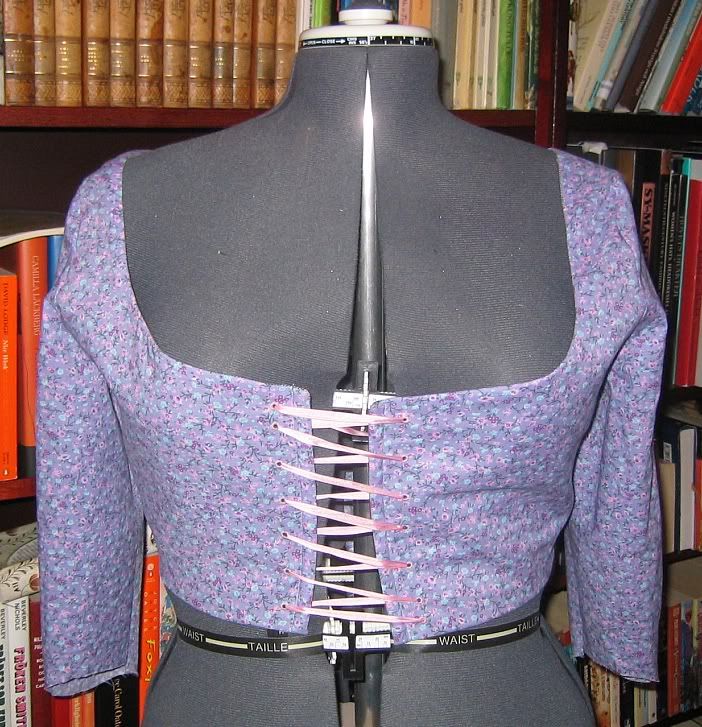
In time I want to have a buttonclosure, but I haven't found the buttons yet. After making all the decisions, the assembling of the jacket went quickly and easily. I was quite amazed.
Photobucket

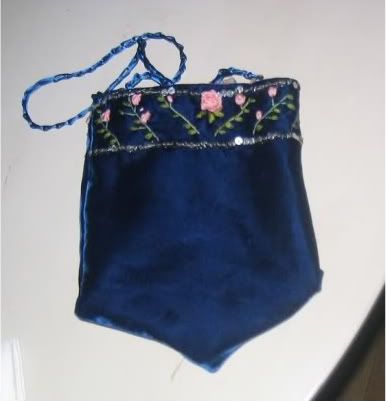
So easy in fact, that I had time to make a reticule. Digging around the net I found this one, dated to the late 18th century.
Photobucket

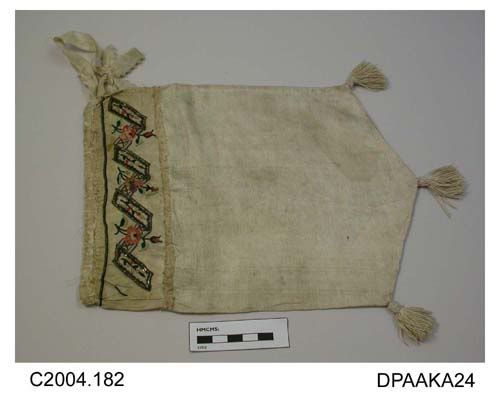
The measurements was kindly provided, so it was an easy task to make a patterns. I've recently learned ribbon embroidered and have looked around for a small project to try it out. So I designed a border I felt I could handle, rosebuds on stems and a bigger rose. I did have to buy some pink and green silk ribbons for that, but not much, as it was such a small project. As I had plenty of velvet left, I decided to make the reticule out of it and line it with the pink silk I used for the sash. I had no trouble at all with the embroideries, but then I decided that I wanted to border it with silver spangles. I have never used spangles before... Practice makes perfect, I guess, and so my spangles are not perfect... And, rather to my surprise, assembling the reticule was the most troublesome part of the whole outfit! For some reason the velvet, who had behaved so nicely when I made the jacket, decided to fray like madly. Then I put in the lining wrong. Twice! And I did the same stupid mistake both times. When it was finally in, I realised that that I had sewn shut the openings for the ribbon channel by mistake. I grumbled a bit over that, but luckily it's also period to sew little rings around the opening to make a closure, so I went with that. I didn't have any ribbons with the right colour, but I had plenty of silk cord. I crocheted it to make it thicker, which I'm fairly certain is not period at all, but was a quick solution. The original had tassels and I have made three tassels that match the fringe of the sash, but I plain forgot to sew them on...
Photobucket

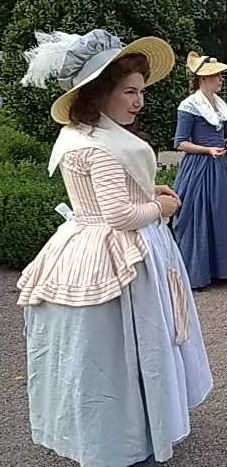
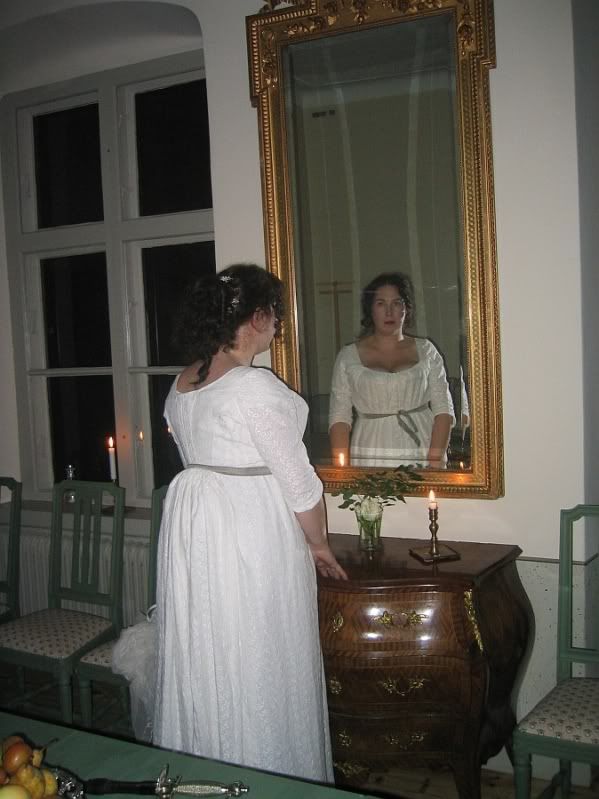
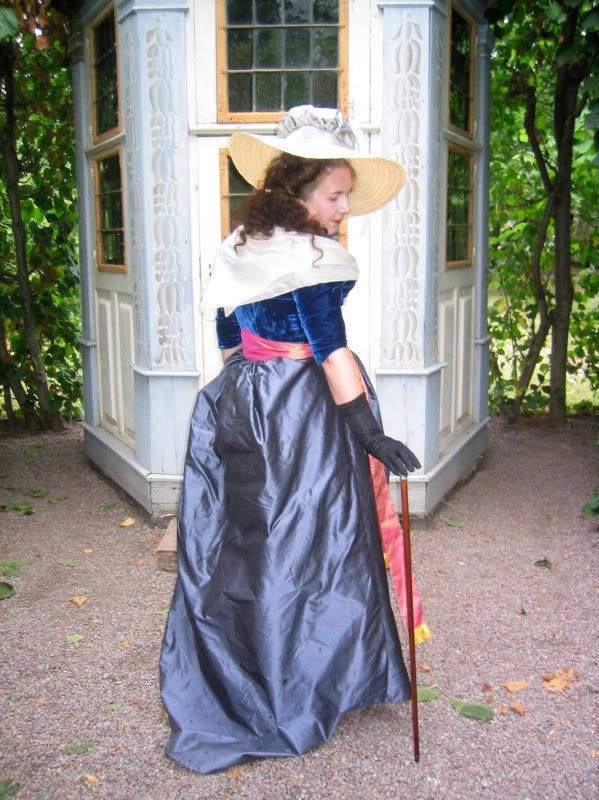
All in all, I'm very pleased with my outfit. There are details that needs to be fixed, but I like the overall impression. I wore it over a cotton petticoat and a small bustlepad and, of course, stays. My stays are earlier than the 1790's, but as I'm very highwaisted I don't really feel the need for a special pair of stays that would just be marginally shorter than the one I have. I would have loved to have a pair of gloves too, and I think I need a long pair anyway, so that is definitely on my list now.
Photobucket
Photobucket

I had a great time at the ball, more pictures can be seen here.

Sources of inspiration
lamodeillustree
Tidens Toj
Janet Arnold Patterns of Fashion>
Britta Hammar & Pernilla Rasmussen Kvinnligt mode under två sekel

Materials
1 ½ metres of blue velvet, single width+the same amount for the lining
2 ½ metres of blue silk taffeta, double width
½ metre pink silk taffeta
Silk ribbons
Silver spangles
A few plastic whale bones
A few silver metal rings and some silk cord

I used my sewing machine for all long assembling seams, but all details, including putting in the sleeves, were made by hand.

Friday, 25 December 2009

The 1790's velvet jacket is done

I'm quite pleased with it. Unfortunately I couldn't get a good picture, as I was home alone and had to take the pic myself, but I wanted to show you as much as I could along with the fabrics I will use for the petticoat and sash.

Photobucket


As always I feel slightly embarassed over my breasts. I read so many snarky comments over costumes where the breasts are overflowing, but most of my breasts are inside my stays- I can't stuff more of them down there. Well, this jacket will be worn with a neckerchief, which will help somewhat.

Tuesday, 24 November 2009

A proper sewing update

A while ago posted a picture and I fell in love. My waning inspiration got a kick-start after watching this:

Photobucket

I find both outfits very pretty, but it’s the one with a pink bodice and blue grey petticoat that made my heart flutter. My first impulse was to buy new fabric for the whole outfit, but then I managed to be wise and dive into my stash instead. And lo and behold, there were 2 metres of blue velvet that I’ve been hoarding since 1990.

As the hem of the bodice, or jacket, isn’t visible- nor is the front, I decided to make it a little jacket with a short basque at the back. I went to Janet Arnold for inspiration and the Regency riding habit there. The painting is dated to 1796, so I’m making it with the bodice as long as my 1797’s gown.

I’m making it in blue velvet and to continuing being thrifty; the lining is made of some leftover cotton. I’m currently sewing the lining to the jacket, but this is what it looked like- and what the jacket will look like as well, only in velvet.
Photobucket


I’ve been much undecided on how to do the closure. The lining will be laced and for now I will simply overlap the velvet and pin close. I think I want to button it, but I haven’t found any buttons I like yet.
Photobucket


I actually have blue grey taffeta in my stash, only a little bit darker than on the painting, so I will use that for the petticoat. And I’ve bought a bit rose-coloured taffeta for the sash, that is two-toned with green. I would very much want a pair of long gloves, but I will have to hope for Santa for those.

To my surprise I got quite a lot of velvet left after cutting the jacket, so I decided to make a reticule out of it. After some browsing I came across this little beauty:
Photobucket

It’s dated to 1790-1810 and measure approximately 19X25 centimetres, so it was easy to make a pattern for it. I wanted to try out ribbon embroidery and felt that this would be a very doable project. Here is a verybad pictures of my progress:
Photobucket

There will be a bigger rose in the middle and borders of silver spangles.

I’ve also been working on more mundane wool skirts, but they’re on hold. Not only because Spiff is on top of them…
Photobucket

“You weren’t planning of using this fabric, were you?”
Related Posts Plugin for WordPress, Blogger...